
Monday, October 27, 2008
Sunday, October 19, 2008
EtsyVeg Team Blog Interview
Yay! I have been interviewed for the EtsyVeg Blog at http://etsyveg.blogspot.com/
Please drop by and say hello to my EtsyVeg Team chums! The team is made up from vegan and vegetarian sellers on Etsy. There is a market guide to the sellers in the Team, plus interviews with sellers, inspirational quotes and featured items for sale.
 "Fire & Water"
copyright Julia K Walton for Fire Horse Textiles 2008
Please drop by and say hello to my EtsyVeg Team chums! The team is made up from vegan and vegetarian sellers on Etsy. There is a market guide to the sellers in the Team, plus interviews with sellers, inspirational quotes and featured items for sale.
"Fire & Water"copyright Julia K Walton for Fire Horse Textiles 2008
Thursday, October 16, 2008
How To: Make An Abstract Button Picture

What Can I Do With My Spare Buttons?
Why not make a piece of abstract artwork to brighten your wall?
I had a nice selection of buttons in beautiful shades of green, brown, stone and cream. They were in a variety of styles and sizes, and some showing signs of their age and use.
They reminded me of the colours of grass, earth and rocks, which led to the idea of a simple picture of layers of earth and rocks that you see in strata at the beach sometimes, or at archaeological digs.

I spent some time working out a pleasing composition, first with pencil and paper, and then with the buttons themselves to achieve a balanced look to the final piece.
 I laid out one line of buttons at a time and carefully used a needle to mark their positions through the sewing holes. The buttons were then removed and set aside in the correct order. The pinprick marks were pushed all the way through the mount board to form sewing holes. Where there was a button with a shank, (just a handful in the whole picture), I used a hollow metal punch and hammer to make the hole.
  I then sewed that line of buttons to the mount board using some vegetable-dyed embroidery yarn from The Natural Dye Studio. I preferred to sew the buttons in place rather than gluing them, because they are not damaged in making the piece and also, they were made to be sewn!
The marking and sewing process was repeated with each line of buttons, then I signed the piece and gave it a title: “Earth Strata”.
 The approximate dimensions are: - 9 11/16" (24.7 cm) wide x 8 13/16" (22.5 cm) tall.
Why not raid your button tin and have a go at your own mini artwork?
Copyright Julia K Walton 2008
Saturday, August 16, 2008
Instructions For Using A Badgeworx Badge/Mirror Maker
Before you begin, it is best to bolt the badge maker to a heavy table or board to stabilise it during use. It is shown fixed to a trestle in the photos below.
To Make A Badge
Components required: - circular metal piece, chosen illustration cut to size with circular cutter, a protective plastic circle, badge back piece.
 Photo 1
1 Remove the bottom part of the badge maker and place it facing the same way up as shown in Photo 1, above.
 Photo 2
2 Add the circular metal piece so that the smooth side faces up as shown in Photo 2.
 Photo 3
3 Add your chosen illustration, followed by the circular piece of plastic.
 Photo 4
4 Put the bottom part of the machine back in place, push the bar to the right as far as it will go.
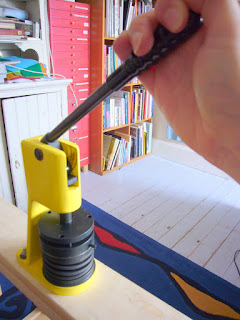 Photo 5
5 Pull the lever firmly down. You will feel it ‘clunk’ as it reaches the bottom position – about the angle shown in Photo 5.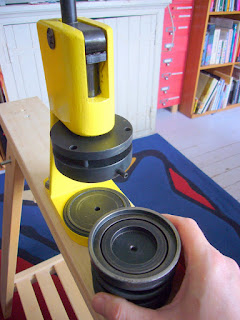 Photo 6
6 The front part of the badge should now be inside the machine. Remove the bottom part from the badge maker.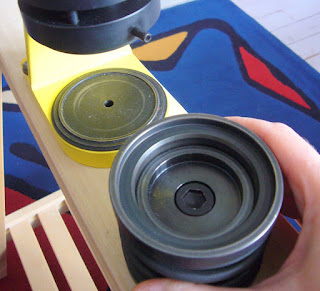 Photo 7
7 Flip the bottom part of the machine over.
 Photo 8
8 Add the badge back in the direction shown in the photo above.
 Photo 9
9 Replace the bottom part of the machine.
 Photo 10
10 Push the bar to the left as far as it will go.
 Photo 11
11 Pull the handle down. It will come down further this time.
 Photo 12
12 The badge is complete – back view.
 Photo 13
13 Completed badge – front view.
 Photo 14
14 Components required for making a mirror shown above, plus your choice of picture, cut to size.
Follow instructions 1 – 7, then…
 Photo 15
15 Squeeze the cardboard circle all over to make it thinner. If you don’t do this, you may end up cracking the mirror while making it.
 Photo 16
16 Add the metal ring with the sharp edges facing up.
 Photo 17
17 Add the mirror, mirrored side facing down.
 Photo 17
17 Add the card.
 Photo 18
18 Push the bar to the left.
 Photo 19
19 Pull the handle down, gently but firmly. If you pull down too hard, the mirror may break…
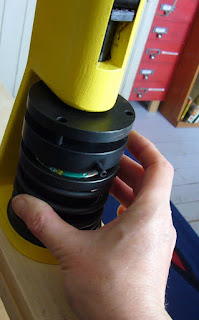 Photo 20
20 Release the handle, twist the bottom part of the machine about a third of a rotation, and repeat instruction 19. Do this two or three times so that the mirror is evenly set in the backing.
 Photo 21
21 Mirror completed – front view.
 Photo 22
22 Mirror completed – back view – this should perhaps be pressed a bit more to get the metal ring below the level of the green part.
To Make a Bottle Opener Key Ring
 Photo 23
23 Components: - picture cut to size, plastic circle, metal circle, bottle opener back piece, and ring attachment.
Follow instructions 1 – 7 above, then…
 Photo 24
24 Add the washer provided to the bottom part of the machine once you have flipped it (Photo 7).
 Photo 25
25 Add the bottle opener back piece, as shown in Photo 25.
 Photo 26
26 Put the bottom part back into the badge maker, push the bar to the left.
 Photo 27
27 Pull the lever down.
 Photo 28
28 Add the key ring, and the bottle opener key ring is complete.
To Make a Key Ring
 Photo 29
29 Components: - picture, plastic circle, white plastic ring, white plastic back piece, metal circle, key ring attachment.
Follow instructions 1 – 7 above, then…
 Photo 30
30 Add the white plastic ring as shown in Photo 30. Then follow instructions 26 and 27 above.
 Photo 31
31 Your key ring should now look like this.
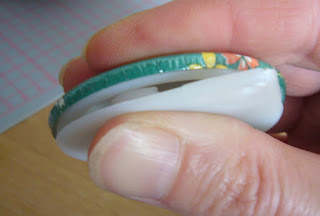 Photo 32
32 Press the plastic back into place.
 Photo 33
33 Add the key ring attachment and it is complete.
These instructions and photographs are copyright Julia K Walton 2008
To Make A Badge
Components required: - circular metal piece, chosen illustration cut to size with circular cutter, a protective plastic circle, badge back piece.
Photo 11 Remove the bottom part of the badge maker and place it facing the same way up as shown in Photo 1, above.
Photo 22 Add the circular metal piece so that the smooth side faces up as shown in Photo 2.
Photo 33 Add your chosen illustration, followed by the circular piece of plastic.
Photo 44 Put the bottom part of the machine back in place, push the bar to the right as far as it will go.
Photo 55 Pull the lever firmly down. You will feel it ‘clunk’ as it reaches the bottom position – about the angle shown in Photo 5.
Photo 66 The front part of the badge should now be inside the machine. Remove the bottom part from the badge maker.
Photo 77 Flip the bottom part of the machine over.
Photo 88 Add the badge back in the direction shown in the photo above.
Photo 99 Replace the bottom part of the machine.
Photo 1010 Push the bar to the left as far as it will go.
Photo 1111 Pull the handle down. It will come down further this time.
Photo 1212 The badge is complete – back view.
Photo 1313 Completed badge – front view.
To Make A Mirror
Photo 1414 Components required for making a mirror shown above, plus your choice of picture, cut to size.
Follow instructions 1 – 7, then…
Photo 1515 Squeeze the cardboard circle all over to make it thinner. If you don’t do this, you may end up cracking the mirror while making it.
Photo 1616 Add the metal ring with the sharp edges facing up.
Photo 1717 Add the mirror, mirrored side facing down.
Photo 1717 Add the card.
Photo 1818 Push the bar to the left.
Photo 1919 Pull the handle down, gently but firmly. If you pull down too hard, the mirror may break…
Photo 2020 Release the handle, twist the bottom part of the machine about a third of a rotation, and repeat instruction 19. Do this two or three times so that the mirror is evenly set in the backing.
Photo 2121 Mirror completed – front view.
Photo 2222 Mirror completed – back view – this should perhaps be pressed a bit more to get the metal ring below the level of the green part.
To Make a Bottle Opener Key Ring
Photo 2323 Components: - picture cut to size, plastic circle, metal circle, bottle opener back piece, and ring attachment.
Follow instructions 1 – 7 above, then…
Photo 2424 Add the washer provided to the bottom part of the machine once you have flipped it (Photo 7).
Photo 2525 Add the bottle opener back piece, as shown in Photo 25.
Photo 2626 Put the bottom part back into the badge maker, push the bar to the left.
Photo 2727 Pull the lever down.
Photo 2828 Add the key ring, and the bottle opener key ring is complete.
To Make a Key Ring
Photo 2929 Components: - picture, plastic circle, white plastic ring, white plastic back piece, metal circle, key ring attachment.
Follow instructions 1 – 7 above, then…
Photo 3030 Add the white plastic ring as shown in Photo 30. Then follow instructions 26 and 27 above.
Photo 3131 Your key ring should now look like this.
Photo 3232 Press the plastic back into place.
Photo 3333 Add the key ring attachment and it is complete.
These instructions and photographs are copyright Julia K Walton 2008
Saturday, August 02, 2008
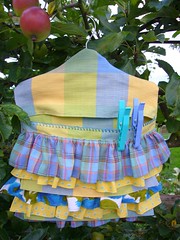
Peg Bag
Originally uploaded by jkw_fire_horse
I made this peg bag using a project from Katie Ebben's book "Fabric Scrapping".
The basic rectangular shape of the bag is shaped to fit your coat hanger at the top. Various flaps and gathered frills are added to the front panel. The opening is hemmed before the sides and bottom of the peg bag are sewn. A row of blanket stitches decorates the bottom edge of the opening.Sunday, March 23, 2008
Rockcliffe and New Abbey Trip
Henry (dog), Rob (my husband) and I enjoyed an outing to Rockcliffe in Dumfries and Galloway this week.
Rockcliffe is a pretty village with a beach, art gallery, café and hotel.

We took a walk along the shore to Castlehill Point, from where you get wonderful views across the Solway to Cumbria.
Rockcliffe is a pretty village with a beach, art gallery, café and hotel.
We took a walk along the shore to Castlehill Point, from where you get wonderful views across the Solway to Cumbria.

The weather was clear and sunny and the scramble over the beach and through a field up to the point was very enjoyable. The walk is about a couple of miles long in total, and is over uneven ground, requiring good walking shoes.

Rob took this photo of a gorse bush on the beach.
On the way home, we stopped at Abbey Cottage – a gift shop and restaurant next to Sweetheart Abbey in New Abbey.
I ate a ploughman’s lunch made with local cheeses; fresh, crunchy salad; chutney; and good, wholemeal bread and butter.
Rob had a jacket potato with vegetarian chilli and salad garnish.
For pudding, I had caramel shortbread ice cream, made by a local company, Cream O’Galloway.
Rob had the sticky toffee pudding.
Everything was superb, including the tea and coffee, and friendly service. Highly recommended.
Saturday, March 15, 2008
Start Improving Your Life Today! - Six Recommended Self-Help Books
I’m quite addicted to reading self-help books. I find that they are useful as I work through them, but the effect gradually wears off and I need to top up with a new fix to get me motivated again.
Many authors regurgitate the same basic information in different forms or with a new spin, but I have found that the following books are all worth reading and following.
If you take the trouble to try out the exercises and genuinely think about the issues raised, they can help you to think about your true priorities and goals in life and motivate you into achieving them. Of course, at some point you have to actually take ACTION rather than just reading about what you should be doing…
6. Eat That Frog! by Brian Tracy
Advice on setting, prioritising and achieving your goals.
5. How To Win Friends And Influence People by Dale Carnegie
A classic text with sound tips on:- making people like you; winning people to your way of thinking; and changing people without causing resentment.
4. 7 Habits of Highly Effective People by Stephen R Covey
Advice on achieving balance in your life and on being successful while adhering to your principles.
3. I Could Do Anything If Only I Knew What It Was by Barbara Sher
A good starting place if you are drifting through life and feeling generally dissatisfied and unfocused.
2. The Artist’s Way By Julia Cameron
Whether you’re a painter, an actor, a writer, or a craftsperson, this book will help to ‘unblock’ your work and move you towards becoming a fulfilled artist.
1. Life Strategies: Doing What Works, Doing What Matters by Dr Phillip C McGraw
I found this to be the most helpful self-help book I’ve read, it contains ‘Life Laws’ and assignments, which will really get you to assess your life and change it for the better.
Can anyone recommend a better self-help book? I’d love to add to my collection!
Subscribe to:
Posts (Atom)