To Make A Badge
Components required: - circular metal piece, chosen illustration cut to size with circular cutter, a protective plastic circle, badge back piece.
 Photo 1
1 Remove the bottom part of the badge maker and place it facing the same way up as shown in Photo 1, above.
 Photo 2
2 Add the circular metal piece so that the smooth side faces up as shown in Photo 2.
 Photo 3
3 Add your chosen illustration, followed by the circular piece of plastic.
 Photo 4
4 Put the bottom part of the machine back in place, push the bar to the right as far as it will go.
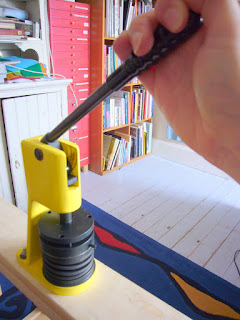 Photo 5
5 Pull the lever firmly down. You will feel it ‘clunk’ as it reaches the bottom position – about the angle shown in Photo 5.
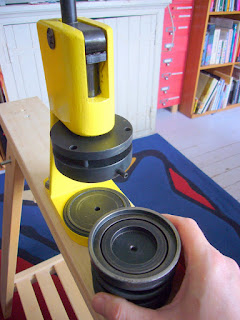 Photo 6
6 The front part of the badge should now be inside the machine. Remove the bottom part from the badge maker.
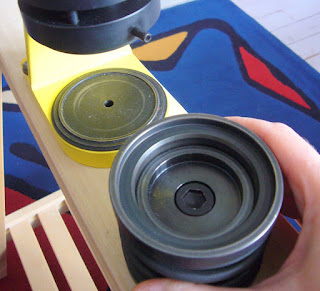 Photo 7
7 Flip the bottom part of the machine over.
 Photo 8
8 Add the badge back in the direction shown in the photo above.
 Photo 9
9 Replace the bottom part of the machine.
 Photo 10
10 Push the bar to the left as far as it will go.
 Photo 11
11 Pull the handle down. It will come down further this time.
 Photo 12
12 The badge is complete – back view.
 Photo 13
13 Completed badge – front view.
To Make A Mirror
 Photo 14
14 Components required for making a mirror shown above, plus your choice of picture, cut to size.
Follow instructions 1 – 7, then…
 Photo 15
15 Squeeze the cardboard circle all over to make it thinner. If you don’t do this, you may end up cracking the mirror while making it.
 Photo 16
16 Add the metal ring with the sharp edges facing up.
 Photo 17
17 Add the mirror, mirrored side facing down.
 Photo 17
17 Add the card.
 Photo 18
18 Push the bar to the left.
 Photo 19
19 Pull the handle down, gently but firmly. If you pull down too hard, the mirror may break…
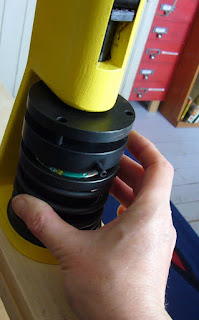 Photo 20
20 Release the handle, twist the bottom part of the machine about a third of a rotation, and repeat instruction 19. Do this two or three times so that the mirror is evenly set in the backing.
 Photo 21
21 Mirror completed – front view.
 Photo 22
22 Mirror completed – back view – this should perhaps be pressed a bit more to get the metal ring below the level of the green part.
To Make a Bottle Opener Key Ring
 Photo 23
23 Components: - picture cut to size, plastic circle, metal circle, bottle opener back piece, and ring attachment.
Follow instructions 1 – 7 above, then…
 Photo 24
24 Add the washer provided to the bottom part of the machine once you have flipped it (Photo 7).
 Photo 25
25 Add the bottle opener back piece, as shown in Photo 25.
 Photo 26
26 Put the bottom part back into the badge maker, push the bar to the left.
 Photo 27
27 Pull the lever down.
 Photo 28
28 Add the key ring, and the bottle opener key ring is complete.
To Make a Key Ring
 Photo 29
29 Components: - picture, plastic circle, white plastic ring, white plastic back piece, metal circle, key ring attachment.
Follow instructions 1 – 7 above, then…
 Photo 30
30 Add the white plastic ring as shown in Photo 30. Then follow instructions 26 and 27 above.
 Photo 31
31 Your key ring should now look like this.
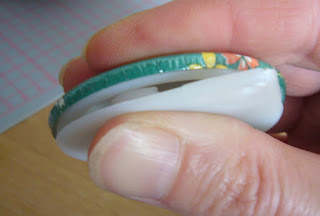 Photo 32
32 Press the plastic back into place.
 Photo 33
33 Add the key ring attachment and it is complete.
These instructions and photographs are copyright Julia K Walton 2008