Showing posts with label firehorsetextiles. Show all posts

Monday, October 08, 2018

Latest Work and Mark-making Experiments in Batik

My latest batch of Prayer Flag Brooches are finished and listed in my Folksy and Etsy Shops.

These ones have a light and fragile look with shades of cream, beige and old gold, lace and buttons.


My next project is going to be a tall thin textile wall hanging based on the path at Samye Ling Buddhist Centre.

The path really caught my eye on a visit there, with its recycled paving slabs of different sizes, and occasional bricks or yellow stripes. I took the photographs below and made a couple of drawings to simplify it into a wall hanging.
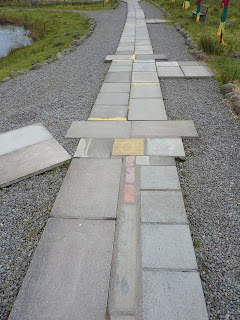


My plan is that many of the steps on the wall hanging will be an art or craft that I have tried over the years as my own 'Path to Enlightenment' of learning about art.

I have tried to make some of my own fabrics with painted dyes, or batik technique and dye.

Painted dye on cotton fabric


Batik with painted dye on cotton

I added these two patterns to my libraries of patterns on Society6 and Redbubble. They look pretty good on the rugs, mugs, bags etc!

I'm on my third 'step', so a long way to go on this project!

Sunday, May 25, 2014

Vintage-Style, Stripy Scrap Patchwork Quilt

This colourful lap quilt or throw is made from 1090 individual pieces of fabric. I aimed to achieve a 'scrappy' vintage look with the eclectic mix of fabrics used.

Included are precious snippets of 1970s Summer dresses, vegetable-dyed fabrics, fabrics dyed by me, repurposed clothing, right up to modern day batiks and Kaffe Fasset shot cottons and colourful flower fabrics.

 The colour scheme goes from light to dark in the columns and from red to orange/yellow, green, brown, blue, purples/lilacs to pinks across the rows.

 The quilt is made in a freely adapted rail fence pattern, with stripes of differing widths, (each stripe may be made from one to three different fabrics), and these are made into 144 five inch squares, and finished off with a yellow and mint binding, inspired by an antique quilt.

 The quilting is machine sewn at 2.5 inch intervals using a cream to beige shaded thread. The wadding is 80% cotton/20% polyester and gives a good combination of warmth and drape to the piece.

 The finished size is approximately:-
5 feet square
(60 inches square)
(152.5 cm square)

 The quilt has been pre-laundered to give it the softness and puckering cherished in vintage quilts.

This quilt is currently for sale in my Fire Horse Textiles on Folksy shop, priced at £300.

Sunday, June 30, 2013

Three Flowers Rag Rug - Progress Report

I have been working on my latest rag rug for a number of months now (just the odd hour now and then). I have nearly finished the hooking on this piece.


This one is made of repurposed fabrics (mainly cotton t-shirts and tops) sourced from family cast-offs, and from charity shops. A few of the fabrics have been overdyed by me (the yellow used in the flower centres, for example).

The rug is hooked onto a natural linen base cloth fixed to a wooden frame.


The design is drawn free hand onto the backing material with a felt-tipped pen. The hooking is done with a hand hook, which looks like a large crochet hook in a wooden handle. The fabric is cut with scissors, into strips of 1/4 - 1/2" in width depending upon the thickness. (This can be done with a rotary cutter and self-healing cutting mat if you prefer a more uniform strip, but I find that it creates more dust that way. I prefer to do a bit of cutting alternated with hooking as it makes for more variety in the work).

 The end of the fabric strip and one loop have been drawn to the front of the rug

To make a loop in the fabric, you start with the strip below the backing fabric, poke your hook into the backing and draw the end of the strip to the surface, leaving about 1/2" above the surface (more if you want a higher pile on your finished rug). Skip a few holes in the backing, poke the hook back through and draw the strip up again forming a loop of your chosen height. I have made the loops about 1/4" high on this piece. I normally pull the loop slightly further up than I want, and use the hand below the fabric to pull the strip back down the right height.

A row of loops (roughly!) following the line of the design

You should end up with rows of little loops on the front and flat 'stitches' on the back. Trim the ends on the front to the height of the loops. You repeat this loop-forming action thousands of times and you have a rug!

 
Front of the rug showing six rows of hooking

It is very easy to learn and you can start by just making a small 'hit and miss' piece like a cushion cover to practise the technique. (Just hook random colours in straight lines, so there is no design or colour placement to worry about.)

Reverse of the rug, showing the flat lines of fabric strip

The technique is very time consuming and you get through far more fabric that you would imagine.  This rug (27 x 35") has so far taken pieces from approximately thirty t-shirts and tops, one pair of leggings and a jersey sheet!

Only a few more weeks of hooking to go...

Sunday, April 14, 2013

Union Jack Bed Quilt

I had an enquiry from a customer in Switzerland to make a bed-sized Union Jack quilt - a much larger version of my patchwork quilt wall hangings.

I had to scale up the small version to make full-sized templates, then take the fabrics and patchwork them together to fit the templates, before sewing the whole top together.

I used a variety of cotton fabrics, including a few recycled pieces which I thought were strong enough to take the wear and tear of a bed quilt. All the fabrics (except the wadding) were pre-laundered to minimise the shrinkage that occurs with cottons, but I did allow some extra length and width, because of possible shrinkage to the wadding.

The pressed backing was then laid out with the cotton wadding in the centre and the ironed quilt top on top. I used a small basting gun to join the three layers together (these use a finer version of the plastic tags that attach labels to garments in shops).


The quilt was then machine sewn, following the lines of the design, and using matching (red, white or blue) thread on the front, and white on the reverse. The quilt was then trimmed to size and bound using white cotton fabric using both machine and hand stitches.


A label with the quilt name, 'Austerity Britain No 10', and my details was added to the back.

Saturday, March 03, 2012

Equinox Best Of British Jewellery Exhibition

If you love jewellery, don't forget to visit the Equinox shop in Fleet to catch their 'Best Of British' jewellery exhibition. The exhibition showcases the work of numerous contemporary designers.


The exhibition is being held in the Equinox shop in Fleet from 18 February until 14 April 2012.

The patchwork union jack wall hangings are displayed in the windows for the duration of the exhibition and will be available for purchase when it ends on 14 April. If you are interested in purchasing either of these handmade pieces, please contact Equinox here.


The photographs are copyright Equinox 2012.

UPDATE: These flag wall hangings are now available at reduced price in my Folksy shop!

Sunday, February 26, 2012

Patchwork Union Jack Wall Hangings

Morning all!

Here are two roughly A1-sized patchwork union jack wall hangings that I finished recently for a commission. They are made to illustrate the theme for an exhibition of contemporary jewellery, called "Best of British". The exhibition in being held in the Equinox shop in Fleet from 18 February until 14 April 2012.

The wall hangings are displayed in the windows for the duration of the exhibition and will be available for purchase when it ends on 14 April. If you are interested in purchasing either of these handmade pieces, please contact Equinox here.

Austerity Britain #8


Green Britain #18


 The wall hangings are made from a mixture of cotton and cotton mix fabrics, including re-purposed fabrics. The following processes, taking around 15 - 20 hours of work per flag, are involved:-
  • making the templates to the required size
  • selecting the fabrics and deciding upon the fabric placement
  • cutting each piece of fabric to size
  • piecing the individual units of fabric into a whole, using a sewing machine
  • layering the finished top with a cotton batting/wadding and back piece
  • hand quilting the layers
  • addition of an edge binding strip and hanging sleeve using a mixture of machine and hand stitches
  • addition of label on reverse and wooden hanging dowel
Smaller versions of the flag wall hangings are sometimes available in my Etsy shop, Fire Horse Textiles.

Sunday, May 15, 2011

Bars & Stripes - Quilted Wall Hanging

"Bars and Stripes" is my latest piece of textile art work, entirely hand sewn. This wall hanging is made from a variety of cotton (one or two cotton mix) fabrics. The textiles used include repurposed (laundered) clothing, as well as some new fabrics.

The fabrics are cut and pieced, then quilted with a thin wadding and backing fabric. A sleeve is added to the reverse with a baton of wood for hanging. The wall hanging is tea dyed in hot water to give it an aged and wrinkled appearance.

The piece measures approx 21 1/2" (54.5 cm) wide, and 27 1/2" (70 cm) high.

The inspiration for this piece came from seeing the wonderful quilts of the Gees Bend community. I immediately grabbed some paper and started cutting and arranging irregular strips of paper to come up with my own design. Then I chose fabrics and colors to give a deliberately asymmetrical and 'improvised' look and feel to the piece. The wall hanging costs $175 from Fire Horse Textiles.

Tuesday, September 28, 2010

LinkWithin

Related Posts Plugin for WordPress, Blogger...